- Clothes and footwear

- All in the category Clothes and footwear
- Footwear

- Jackets

- Military Blouses

- Trousers

- Functional clothing

- Sweatshirts

- Shirts

- Hawaiian & Lifestyle Shirts

- T-shirts

- Shorts, Bermuda shorts

- Overalls

- Caps and head coverings

- Gloves

- Socks

- Belts

- Suspenders

- Scarves, shawls, neckwear

- Raincoats, ponchos

- Women's clothing

- Children's clothing

- Clothing maintenance

- Patches & Insignia

- Vests

- Sweaters

- Camping and hiking

- All in the category Camping and hiking
- Backpacks

- Bags, satchels, suitcases, waist bags

- Sleeping in nature

- Cookers, grills

- Lighting a fire

- Dishes, tableware

- Dining in nature (Food for the journey)

- Survival kit

- Compasses

- Climbing equipment

- Flashlights

- Camping furniture

- Eye-glasses

- Telescopes

- Hydration

- Water purification

- Small Equipment and Essentials for Survival

- Electronics and accessories for mobile phones

- Watches

- Cases

- Paracords

- Wallets

- Towels

- Solar showers

- Waterproof notebooks

- Mosquito and insect protection

- Foot, hand, and body warmers

- Repair kits and fixing tapes

- Boating equipment

- Health, protection

- Tactical gear

- All in the category Tactical gear
- Plate carriers and accessories

- Load-bearing harnesses

- Tactical vests

- Tactical cases and pockets

- Ballistic protection

- Hearing protection

- Protection

- Tactical and military backpacks

- Tactical and combat belts

- Tactical Eyewear

- Flashlights for soldiers and police

- Helmets, coverage

- Camouflage

- Gas masks and protective equipment

- Medical equipment

- Boxes, cases

- Battering rams, crowbars

- Gear for dogs

- Gunner's supplies

- All in the category Gunner's supplies
- Shooting Glasses

- Weapon bags

- Shooting gloves

- Weapon cases

- Weapon Slings

- Optical sights

- Rangefinders

- Gun flashlights and lasers

- Cleaning, maintenance

- Gun waist bags

- Shooting bags

- Shooting mats

- Boxes and cases for ammunition

- Training equipment for shooting

- Bullet traps

- Speed loaders

- Knives and Tools

- Self-defence

- Guns and ammunition

- Other

- By interest

Limb Injuries (4): Improvised Transport and Recommended Equipment
In the previous article, we discussed how to provisionally stabilize an injured limb in outdoor conditions. This article continues with the topic of improvised transport—situations where waiting for rescue is not an option and the injured must be moved using only available resources. Improvised transport requires careful assessment of both the situation and your capabilities. It is not the preferred option, but in remote or rugged terrain, it may become necessary. Here, we’ll explore when to consider moving the injured, how to do so as gently as possible, and what tools or improvisations can help.
When and Why to Move an Injured Person
Improvised transport should always be a last resort, justified by real necessity. Proper and gentle movement of an injured person is both physically and mentally demanding. It requires experience, teamwork, and the right equipment—things that are often lacking in non-professional, outdoor scenarios.
It’s important to consider that you might lose access to gear you’ll need later during the transport. In addition to the physical and emotional stress, rescuers face the risk of exhaustion or injury themselves.
Before deciding to transport the injured, carefully evaluate whether it might be safer to remain on site and provide basic care. Consider whether you can call for help—something that can be very limited in remote areas. Assess the severity of the injury, terrain difficulty, current weather, your physical and mental capacity, and above all, the risk that improper transport could worsen the injured person’s condition.
✅ When to Initiate Transport
- The injured person is in immediate danger (avalanche risk, unstable terrain, extreme weather, etc.)
- There's no way to call for help, and leaving or sending a group is necessary
- The condition is worsening or complications are developing (hypothermia, bleeding, shock…)
- Staying put poses risks to the injured person, rescuers, or the entire group
- Rescuers lack the knowledge or capability to manage the situation on site
🟧 Evacuation – Calling for Help
- The injury is life-threatening or rapidly deteriorating
- Safe transport cannot be achieved with the available resources
- The group lacks the strength, numbers, or equipment for self-evacuation
⛔ When Not to Transport
- The injured person is not in immediate danger
- Basic care and safety can be provided on site
- Condition is stable or expected to improve
- Professional help is expected to arrive before transport could be completed
- Transport would carry more risk than staying in place

A mountain rescue operation in exposed terrain. Rescuers are securing and preparing the injured person for stretcher transport under challenging alpine conditions. Coordination, speed, and thermal protection are critical.
Risks of Improper Transport
Improvised transport in rugged terrain always carries risks—not just for the injured, but also for their helpers. Even well-meaning attempts to move or support the injured person can cause complications or worsen existing injuries.
❌ Potential risks include:
- Worsening the limb injury – Poor fixation or mishandling can cause further damage to tissues, nerves, or blood vessels.
- Spinal injury – If a spinal injury is unrecognized or unsupported, it may lead to permanent spinal cord damage.
- Loss of consciousness or shock – Movement may exacerbate internal bleeding or pain, worsening the overall condition.
- Hypothermia or overheating – Prolonged transport without protection from cold or heat significantly increases complications.
- Rescuer exhaustion – Physical and mental fatigue can result in coordination loss, injuries, or complete mission failure.
- Loss of critical equipment – Challenging terrain can lead to damage or loss of supplies essential for ongoing care.
👉 A simple rule to follow: If you must transport someone, do it thoughtfully, slowly, and safely.
Alternatives to Improvised Transport
🟩 Call for Help
If there is any way to contact emergency services, this is always the safest option. Use all available resources:
- Mobile phone – Use your country's emergency number (e.g., 112 in Europe, 911 in the US and Canada, 000 in Australia).
- Emergency apps – If available in your region, use dedicated rescue apps (e.g., Záchranka in Central Europe).
- Satellite communication –Devices like Garmin InReach, SPOT, or Zoleo allow you to send SOS messages from remote areas without cellular signal.
- Two-way radios / walkie-talkies – Useful for communication within your group or, in some regions, with local rescue services or park rangers.
👉 Always check and save local emergency numbers and contact options before heading out to a new area.
📍 What to Mention When Calling for Help
- Precise location – coordinates from an emergency app or GPS device
- Condition of the injured person – level of consciousness, type of injuries, bleeding, breathing status
- Number of people and available resources – size of the group, first aid supplies, shelter, etc.
- Terrain and current conditions – snow, fog, darkness, avalanche risk, etc.
🟨 Stay in Place and Provide Basic Care
If the injured person is not in immediate danger, it’s often safer to stay on-site. Provide fixation, warmth, hydration, and psychological support. This is often better than risking a dangerous evacuation.
📌 Follow-up to the Previous Article
Do you know what to do when emergency services are unavailable and the injury is unstable? Revisit the key principles of field care, splinting, and preparation for transport in the previous part of the series:
🟧 Send a Group for Help
If communication is impossible from the incident site, you may need to send part of your group for help—ideally in pairs, while at least one person remains with the injured. This decision should be made carefully based on the terrain and situation.

First aid in the mountains. Rescuers respond to an injured person in difficult-to-access terrain, where they use specialized equipment – including a rescue kit, helmets, and ropes. Emphasis is placed on stabilizing the condition and ensuring team safety.
Key Principles for Improvised Transport in the Field
✅ Only transport when it is clearly safer for the injured person than remaining in place—such as when their condition could deteriorate with further delay.
✅ Before beginning transport, prepare thoroughly:
- Assess the situation and choose the best transport method based on the injury, terrain, and available materials.
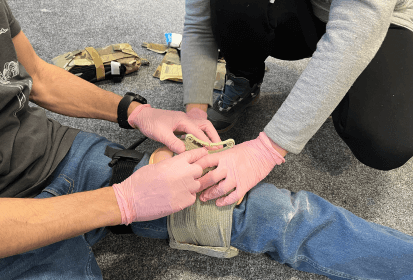
- Treat the injury and carefully immobilize the limb with a makeshift splint.
- Ensure thermal comfort—protect the injured from cold, wind, or overheating.
- Plan your route—it should be as straight, short, and safe as possible.
✅ Transport should be as gentle as possible:
- Minimize jolts, shocks, and limb movement.
- Continuously monitor the injured person—consciousness, circulation in fingers, pain, thermal comfort.
- Take regular, short breaks.
✅ Involve multiple people: One carries, another stabilizes the person, and a third monitors their condition and communicates. If you’re a small group, take turns based on strength.
Methods of Improvised Transport
Without Equipment
🟠 Assisted Walking
For minor injuries like sprains or fatigue: two helpers support the injured on either side, their arms over the rescuers' shoulders.
🚶♂️ Assisting a Walking Injured Person: Suitability and Limitations
- 💪 Suitable for: minor lower limb injuries, exhaustion
- ✅ Advantage: minimal physical strain for rescuers
- ❌ Limitation: the injured person must be conscious and able to cooperate
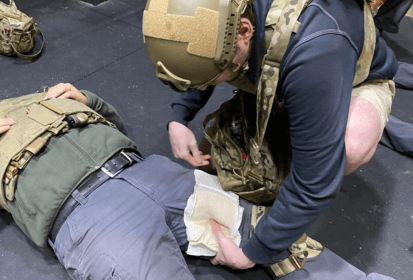
🟠 Rautek Maneuver
Used mainly to quickly evacuate someone from danger (e.g., a collapse zone). The injured is seated; the rescuer wraps their arms under the person's armpits, grabs the forearms or wrists, and drags them backward.
👉 A second rescuer can support or carry the legs to ease handling and reduce risk of further injury.
🆘 Rautek Maneuver: When and How to Use It
- 💪 Suitable for: unconscious individuals, evacuation from a hazardous area
- ✅ Advantage: can be performed by a single rescuer
- ❌ Limitation: not suitable for long distances or rough terrain

The Rautek maneuver is used for rapid evacuation of an unconscious person from a danger zone. The rescuer grips the casualty from behind under the arms and drags them to a safer location. Suitable for short-distance moves in critical situations.
🟠 Fireman’s Carry
The rescuer hoists the injured person over both shoulders—torso on one, legs on the other. This requires strength and proper technique.
💪 Fireman’s Carry
- 💪 Suitable for: a strong rescuer and a smaller injured person
- ✅ Advantage: weight is distributed over the shoulders, allowing one hand to remain free
- ❌ Limitation: not suitable if spinal or lower limb injuries are suspected
🟠 Two-Person “Chair” Carry
Two rescuers form a “chair” with their arms (or arms and backs), and the injured person sits on it. One supports the back, the other the legs.
🪑 Two-Person Seat Carry
- 💪 Suitable for: fully conscious individuals who cannot walk but can cooperate
- ✅ Advantage: weight is evenly distributed between two rescuers
- ❌ Limitation: not suitable for difficult or uneven terrain

The four-handed seat carry is a simple method of improvised transport performed by two rescuers. By interlocking wrists and palms, they form a stable seat for the injured person to sit on. Suitable when the person is fully conscious and able to cooperate.
With Equipment
🔵 Using a Backpack
A sturdy hiking backpack (with a rigid frame and hip belt) can serve as a transport aid.
The injured person leans against the pack; the rescuer secures them using straps, scarves, or clothing strips—typically across the chest and thighs. The "package" is then carried like a normal backpack.
👉 Note: Always pad the straps (e.g., with a folded piece of clothing) to prevent pressure points or cutting into the skin. This method is only suitable if the injured person is lightweight, the rescuer is physically strong, and the terrain is safe. Use for short distances only.
🔵 Using Rope or Rolled Emergency Blankets
If you lack a stretcher, you can improvise sling straps from rope, flat loops, or tightly rolled foil blankets.
Pass one set under the armpits and another under the thighs or knees, forming a simple seated harness. Two rescuers carry the person suspended between them using these straps.
- ✅ Advantage: weight is shared between two carriers, and it can be used even in more difficult terrain.
- ⚠️ Limitation: not suitable for long distances – and beware of straps cutting into the body. Always pad them (with clothing, foam, or any soft material).
- 🟠 Recommendation: works best for smaller, lighter individuals when no other transport option is available.
🔵 Two Backpacks and Four Trekking Poles
This method creates a makeshift “seat” using two solid backpacks and four trekking poles.
Steps:
1. Place the two backpacks side-by-side on the ground, with their backs facing up. Shoulder and hip straps stay unused.
2. Insert four trekking poles horizontally underneath the back panels—two in front, two in back—forming a rigid seat.
3. The injured carefully sits on the structure, legs hanging down, maintaining balance and communication.
4. Two rescuers wear the packs simultaneously and lift the seated person together.
📌 Key Tips for Transport Using Backpacks and Trekking Poles
- Four poles help distribute the weight evenly and reduce the risk of breakage.
- Backpacks must be sturdy and properly packed to maintain their shape.
- Suitable for moderate terrain and mid-range distances.
- Test the setup in advance—check for stability and structural integrity.
- Monitor the injured person’s condition and ensure you can safely set down the structure at any time.
🔵 Improvised Stretcher
If the injured person is completely immobile, and no carrying or supporting method is viable, you can build an improvised stretcher from available gear.
This allows safer and more stable movement but requires at least two bearers and a strong enough structure.
🛠️ Materials You Can Use for Improvised Stretchers
- Tarp + Four Trekking Poles or Sturdy Branches
Lay a tarp (such as a poncho, windbreaker, or groundsheet) flat on the ground. Roll the edges around two parallel poles or branches on each side to create a stable stretcher. Always use four poles (two on each side) to prevent sagging or breakage. - Jackets or Pants + Four Poles or Branches
Thread two jackets or pairs of pants between four parallel poles—sleeves or pant legs form the carrying surface. This method is better suited for lighter individuals or short-distance transport. - Sturdy Branches + Multiple Layers of Fabric
Stretch several layers of clothing (sweaters, hoodies, etc.) between two long branches. The more layers used, the better the comfort and weight distribution.
Gear in Your Backpack That Helps with Transport
🎒 Useful Items for Improvised Transport
Certain items in your backpack can significantly ease the process of improvised casualty transport:
- Emergency (space) blanket – for use as an improvised tarp or to retain body heat.
- Flat slings, carabiners, triangular bandage, paracord – for securing limbs or building makeshift supports.
- Duct tape – a versatile tool for reinforcement and emergency repairs.
- Lightweight aluminum rods or collapsible trekking poles – useful as splints or stretcher components.
Summary: When and How to Transport an Injured Person in the Field
Improvised transport is always a last resort—but in some situations, it may be the only option. If the person’s condition risks deteriorating or remaining in place is too dangerous, a careful evacuation might be the best chance for survival.
Before deciding to move the injured:
- Assess the risks—for both the injured and the rest of the group.
- Choose a suitable transport method and prepare the necessary gear.
- Thoroughly treat the injury—especially immobilize the limb and ensure thermal comfort.
- Plan your route and schedule, including potential rest points and carrier rotations.
👉 Remember: Even improvised transport can be safe—when preceded by proper planning and sound judgment. If professional help can be summoned, always make that your first option.
Readers are further interested